OneMeta SIP Trunking Configuration Guide
Avaya Aura 6.3.18.0.631804 With Avaya SBCe 6.3.7-01-12611
June 2017
Below we provide example configurations for using OneMeta SIP service with Asterisk.
Contents
- Contents
1. Introduction
2. SIP Trunking Network Components
2.1 Network Components - 3. Features
3.1.1 Features Supported
3.1.2 Features Not Supported by PBX
3.1.3 Caveats and Limitations - 4. Configuration
4.1 IP Address Worksheet
4.2 Configuring Avaya Aura Communication Manager
4.2.1 Licenses
4.2.2 System Features
4.2.3 IP Node Names
4.2.4 IP Codecs
4.2.5 IP Network Region
4.2.6 Signaling Group
4.2.7 Trunk Group
4.2.8 Route Pattern
4.2.9 Dialing Pattern and Feature Code
4.2.10 Call Routing
4.2.11 Caller ID
4.2.12 Avaya Aura Extensions
4.3 Configuring Avaya Aura Session Manager
4.3.1 Add Adaptations
4.3.2 SIP Entities
4.3.3 Routing Policies
4.3.4 Dial Patterns
4.3.5 SIP Extension
4.4 Configuring Avaya Session Border Controller for Enterprise
4.4.1 Global Profile
4.4.2 Domain Policies
4.4.3 Device Specific Settings
4.5 Avaya Modular Messaging
4.6 Nexmo Configuration
4.6.1 Configure Numbers in Nexmo Account
1. Introduction
This document is intended for the SIP trunk customer’s technical staff and Value Added Retailer (VAR) having installation and operational responsibilities. This configuration guide provides steps for configuring Avaya Aura 6.3.18.0.631804 and Avaya SBCe 6.3.7-01-12611 to Nexmo SIP Trunking services.
2. SIP Trunking Network Components
The network for the SIP trunk reference configuration is illustrated below and is representative of an Avaya Aura and Avaya SBCe configuration to Nexmo SIP trunking.
2.1 Network Components
Component | Version | Comments |
---|---|---|
Avaya Aura | 6.3.18.0.631804 | |
Avaya SBCe | 6.3.7-01-12611 | |
Avaya MM | 5.2-11.0 | Avaya Voicemail |
Avaya 9630G | SIP96xx_2_6_14.5.bin |
Avaya Phone |
Cisco IP Phone | Model: CP-7965 App Load ID: jar45sccp.9-4-2TH1-1.sbn Boot Load ID: tnp65.9-3-1-CR17.bin |
This Cisco IP Phone is the PSTN test device |
3. Features
3.1.1 Features Supported
- Incoming and outgoing off-net calls using G711ULAW & G711ALAW voice codecs
- Calling Line (number) Identification Presentation
- Calling Line (number) Identification Restriction
- Call hold and resume
- Call transfer (unattended and attended)
- Call Conference
- Call forward (all, no answer)
- DTMF relay both directions (RFC2833)
- Media flow-through on Avaya SBCe
3.1.2 Features Not Supported by PBX
3.1.3 Caveats and Limitations
4. Configuration
4.1 IP Address Worksheet
The specific values listed in the table below and in subsequent sections are used in the lab configuration described in this document, and are for illustrative purposes only. The customer must obtain and use the values for your deployment.
Table 1 – IP Addresses
Component | Lab Value | Customer Value |
---|---|---|
Avaya SBCe | ||
LAN IP Address | 10.70.4.13 |
|
LAN Subnet Mask | 255.255.255.0 |
|
WAN IP Address | 192.xx.xx.XXX |
|
WAN Subnet Mask | 255.255.255.128 |
|
Avaya Aura | ||
System IP Address | 10.70.4.3 |
4.2 Configuring Avaya Aura Communication Manager
This section describes the Avaya Aura Communication Manager configuration necessary to support connectivity to Avaya SBCe. A SIP trunk is established between Communication Manager and Session Manager for use by signaling traffic to and from Nexmo via Avaya SBCe. It is assumed that the general installation of Communication Manager, the Avaya G430 Media Gateway and Session Manager has been previously completed.
The Avaya Aura Communication Manager configuration was performed using System Access Terminal (SAT) via Putty.
4.2.1 Licenses
In order to connect to Nexmo, Avaya Aura Communication Manager needs to have enough SIP trunk licenses. Use the display system-parameters customer-options
command to verify the available SIP Trunk licenses
4.2.2 System Features
Use the change system-parameters features
command and ensure Trunk to Trunk Transfer is set to all
4.2.3 IP Node Names
Use the display node-names IP
command to verify that node names have been properly defined for Communication Manager (procr
) and Session Manager (AASM in this test). These node names will be needed for configuring the Signaling Group later.
4.2.4 IP Codecs
The change ip-codec-set
command is used for assigning the proper codecs. For this setup, ip-codec-set 1
is used.
4.2.5 IP Network Region
For this test, IP Network region 3 was created using the change ip-network-region 1
command
4.2.6 Signaling Group
Use the add signaling-group x
command to create a signaling group 2 between Communication Manager and Session Manager for SIP trunk calls.
4.2.7 Trunk Group
Use the add trunk-group x
command to create trunk groups for the associated signaling group, trunk group 2 is associated with Signaling group 2 for SIP trunk between CM and SM.
- The Numbering Format is set to Public. Outbound calls to Nexmo uses this trunk and uses the Public Numbering table to send the calling party number.
- Send Diversion Header is enabled to send the diversion information for voice mail.
4.2.8 Route Pattern
Use the change route-pattern 2
command to add routing preference for SIP trunk to Session Manager.
- This route is associated with trunk group 2
4.2.9 Dialing Pattern and Feature Code
Use the change dialplan
analysis and change feature-access-codes
commands
- ARS access code is set to 9
4.2.10 Call Routing
4.2.10.1 Outbound Calls
The change ars analysis
command is used for outbound PSTN call routing. 121 is shown as an example setup for this test.
- Route pattern 2 is used for PSTN call routing.
4.2.11 Caller ID
The change private-numbering 2
command is used to assign the Caller ID for 4 digit Avaya Aura extension.
- Trunk group number 2 is used.
4.2.12 Avaya Aura Extensions
Create a SIP extension as shown below.
- Enter station extension.
- Application: Type
OPS
- Trunk Selection: Type
aar
4.3 Configuring Avaya Aura Session Manager
The Avaya Aura Session Manager configuration utilizes Avaya Aura System Manager. The Avaya Aura System Manager Web login screen is accessed via https://IP Address/FQDN
. Use admin as User ID and input associated password, and then click Log on. It is assumed that the Domain, Location and Endpoint for Session Manager have been previously configured.
Navigate to Home > Elements > Routing
4.3.1 Add Adaptations
Modifications to the SIP messaging within the Session Manager can be made in the Adaptions module. The idea here is to create an adaptation entity, identified by its Name, and then assign it to a SIP Entity.
Navigate to Routing > Adaptations > New
4.3.1.1 Adaptation for Avaya SBCe
The following adaption rules are provisioned in the "Module parameter" field:
fromto =true:
If set to true, then adaptation modifies From
and To
headers of the message.
- An adaptation is created under the Digit Conversion for Outgoing Calls from SM to cause SM to insert the + sign in the From and To headers on SM-originated calls routed to Avaya SBCe.
4.3.2 SIP Entities
4.3.2.1 SIP Entity for Avaya SBCe
- Add the AvayaSBC Adaption created earlier, to the SIP Entity
- The link between the SM and the Avaya sBCe was configured as trusted using TCP protocol and port 5060
4.3.2.2 SIP Entity for Avaya CM
- The link between the Avaya SM and the CM was configured as trusted using TCP protocol and port 5060.
4.3.2.3 SIP Entity for Avaya MM
- The link between the Avaya SM and the Avaya MM was configured as trusted using TCP protocol and port 5060
4.3.3 Routing Policies
Navigate to Routing > Routing Policies > New
4.3.3.1 Routing Policy to Avaya SBCe
Create a routing policy to Avaya SBCe as shown below.
4.3.3.2 Routing Policy to Avaya CM
Create a routing policy to Avaya CM as shown below
4.3.3.3 Routing Policy to Avaya MM
Create a routing policy to Avaya MM as shown below
4.3.4 Dial Patterns
4.3.4.1 Routing Policy to Avaya SBCe
- Create a dial pattern to route the call to PSTN via Avaya SBCe and link the Routing Policy to Avaya SBCe as shown above.
4.3.4.2 Routing Policy to Avaya CM
- Create a dial pattern to route the call to Avaya Aura and link the Routing Policy to Avaya CM as shown above
4.3.4.3 Routing Policy to Avaya MM
- Create a dial pattern to route the call to Avaya MM and link the Routing Policy to Avaya MM as shown above
4.3.5 SIP Extension
Create a SIP user profile as shown below.
Navigate to User Management> Endpoints > Manage Users
4.4 Configuring Avaya Session Border Controller for Enterprise
- Log into Avaya Session Border Controller for Enterprise (SBCE) web interface by typing "https://X.X.X.X/sbc".
- Enter the assigned Username and Password
- Click Log In
4.4.1 Global Profile
4.4.1.1 Server Interworking
Navigate to System Management > Global Profiles > Server Interworking. Create a clone named AASM of predefined Interworking Profile avaya-ru
as shown below.
Create a Serving Interworking profile for Avaya SM as shown below.
Create a Serving Interworking profile for Nexmo as shown below.
4.4.1.2 Routing
Navigate to System Management > Global Profiles > Routing
Creating a Routing profile for Avaya Session Manager as shown below.
Creating a Routing profile for Nexmo as shown below.
4.4.1.3 Server Configuration
Navigate to System Management > Global Profiles > Server Configuration
Create a Server configuration profile for Avaya Session Manager as shown below.
Create a Server configuration profile for Nexmo as shown below.
4.4.1.4 Topology Hiding
Navigate to System Management > Global Profiles > Topology Hiding
Creating a Topology hiding profile for Avaya Session Manager as shown below
4.4.2 Domain Policies
4.4.2.1 Signaling Rules
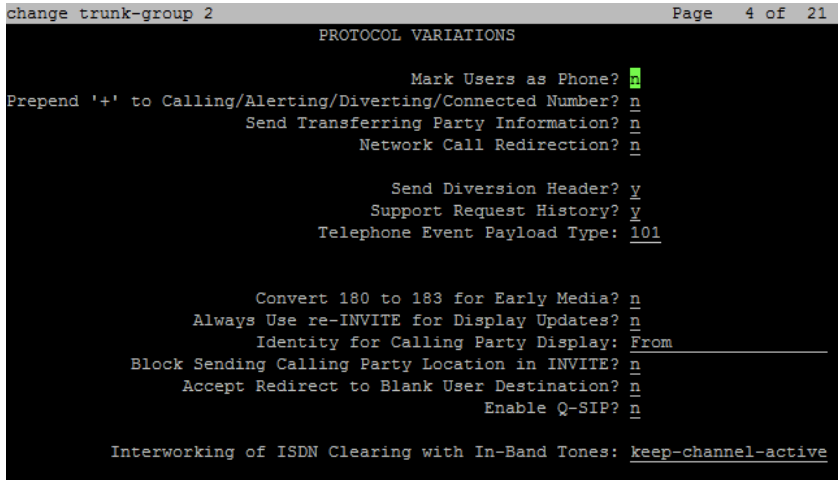
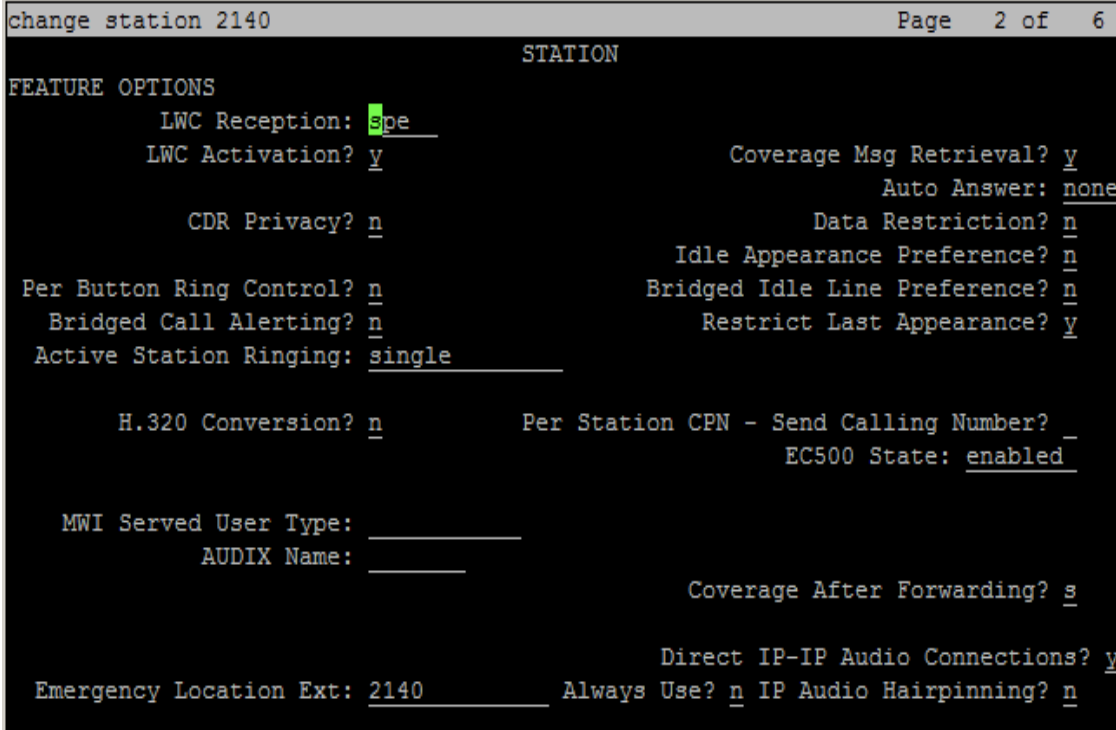
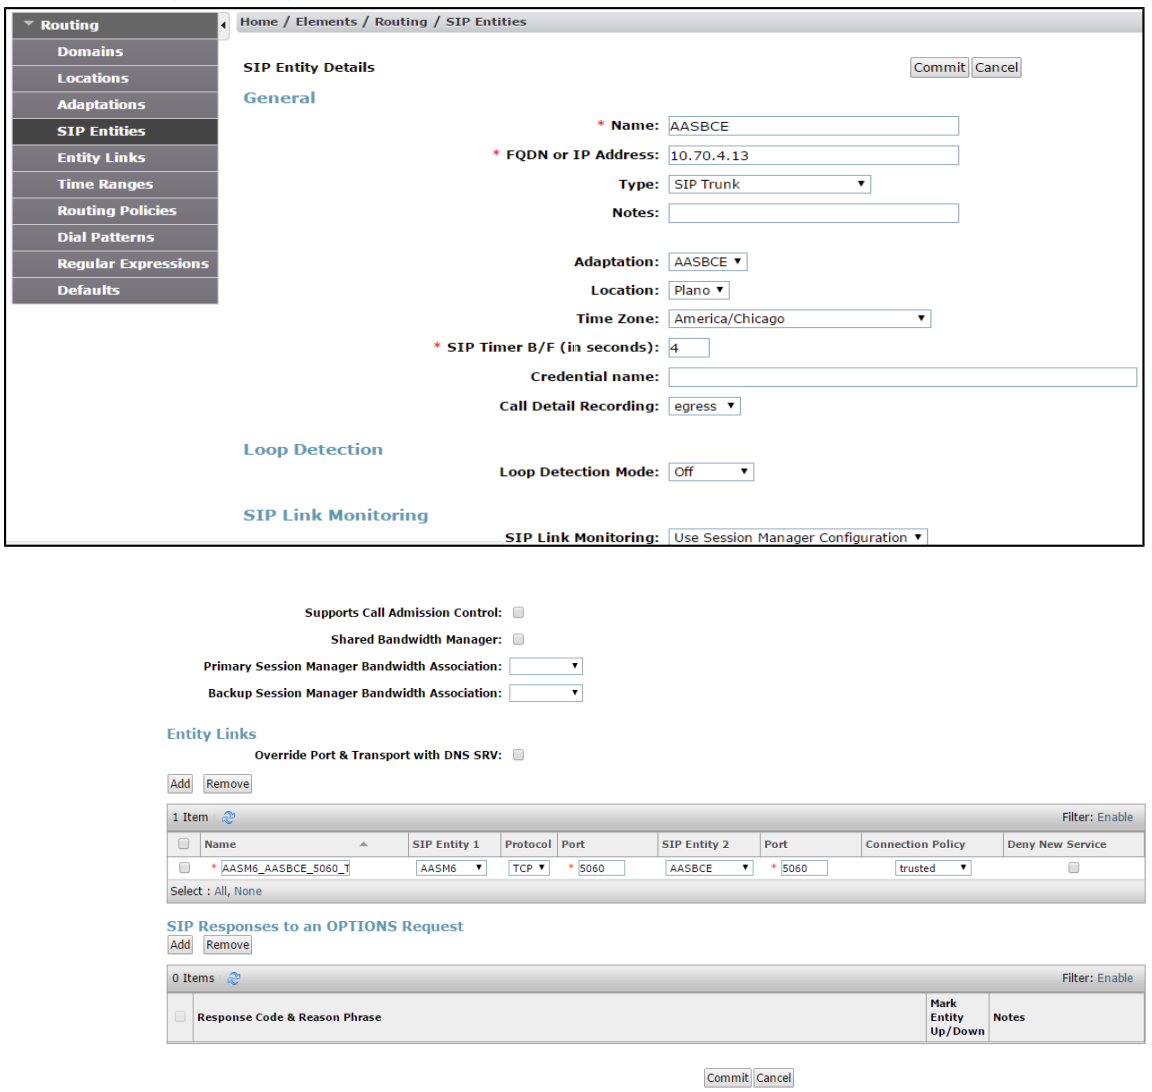
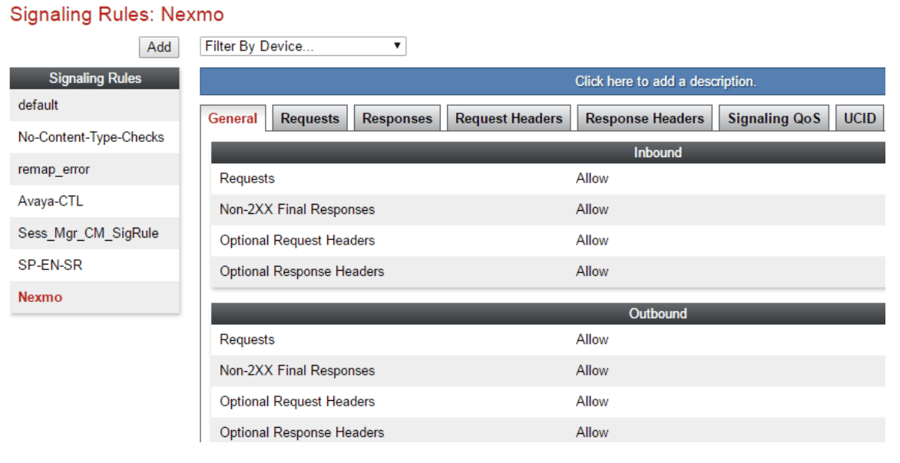
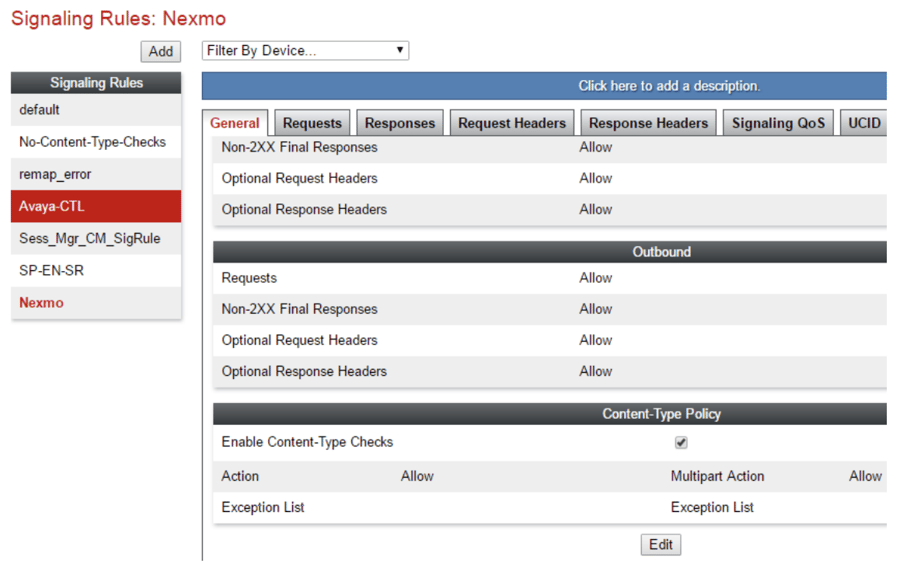
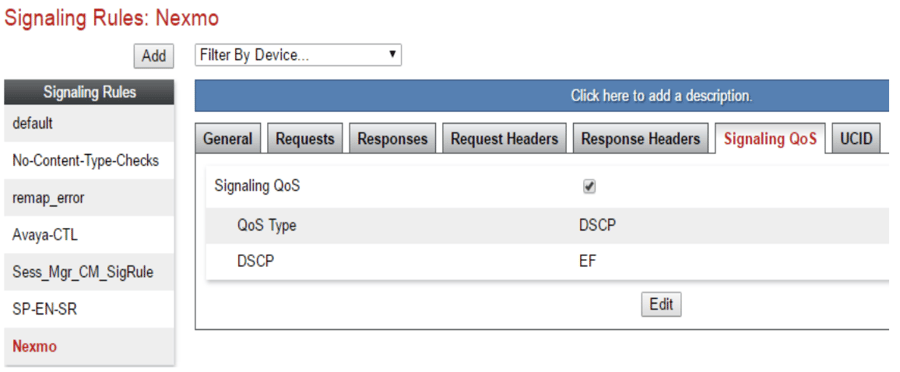
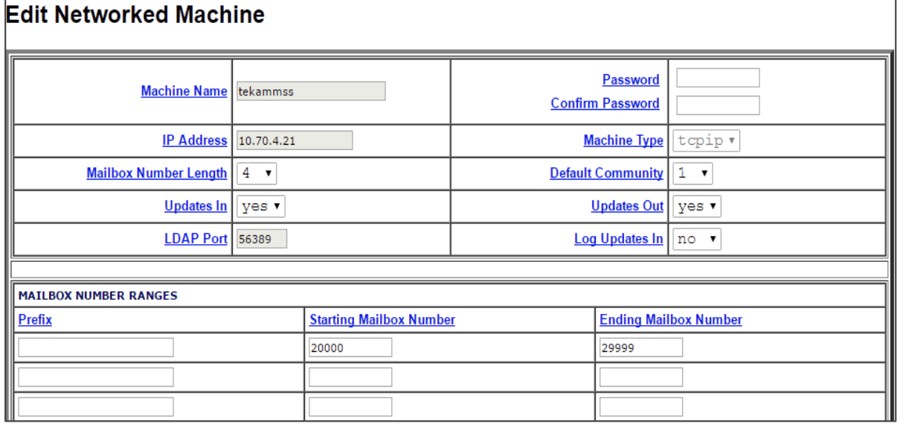
Signaling Rules define the actions to be taken (Allow, Block, Block with Response, etc.) for each type of SIP-specific signaling request and response message.
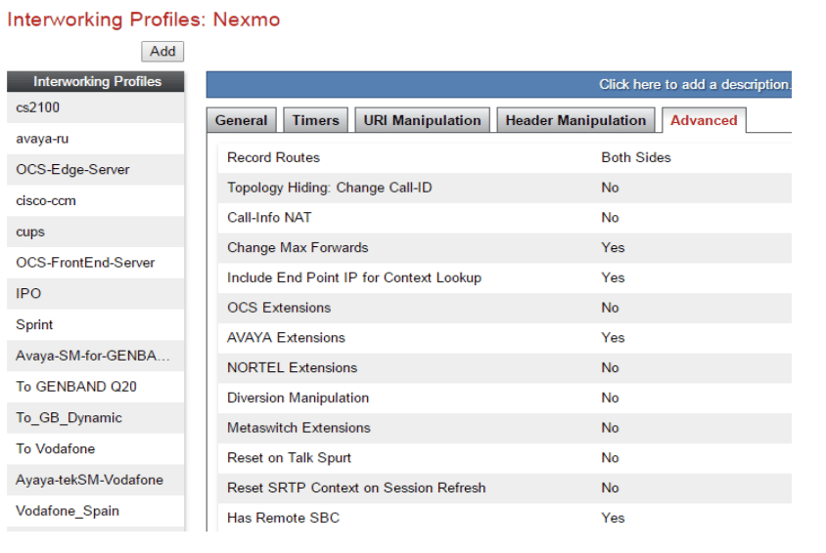
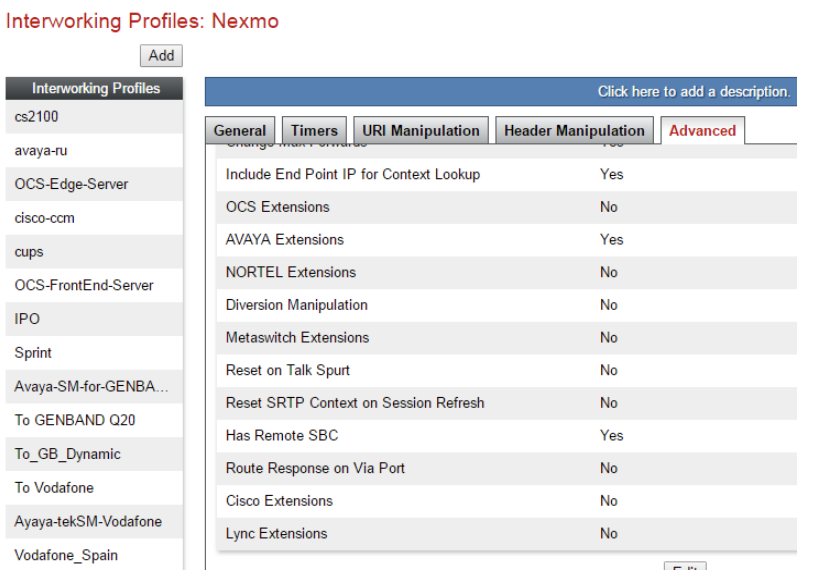
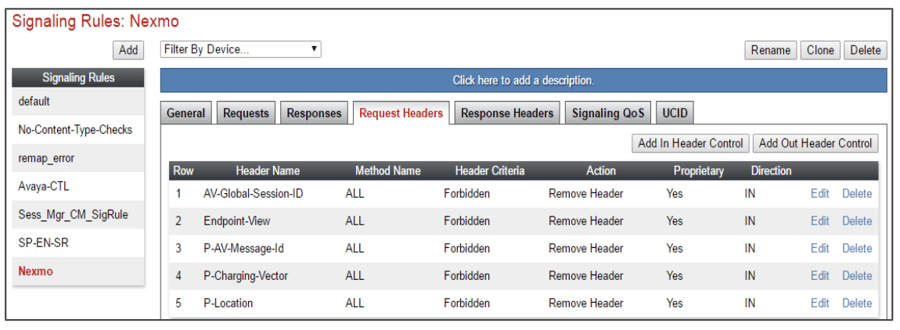
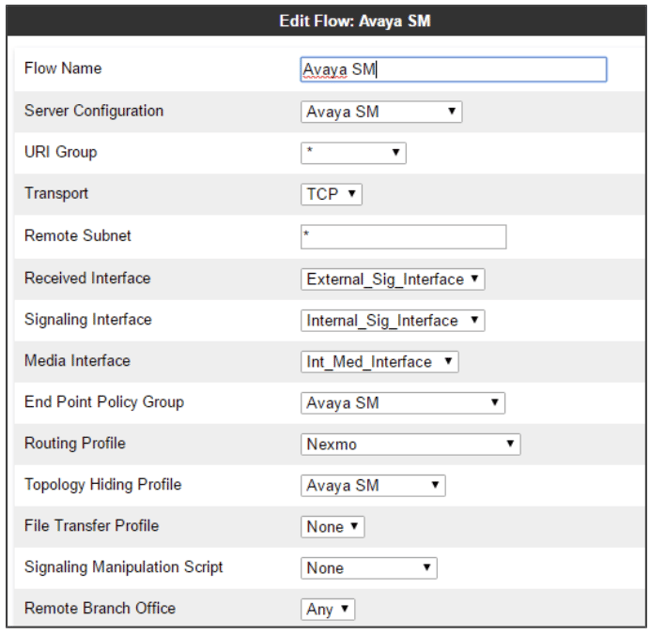
Headers such as P-Location, P-Charging-Vector and others are sent in SIP messages from Session Manager to the Avaya SBCe for egress to the Nexmo.
A Signaling Rule was created, to later be applied in the direction of the enterprise to block unwanted headers coming from Session Manager from being propagated to Nexmo.
4.4.2.2 End Point Policy Groups
End Point Policy group "Avaya SM" is created as shown below
4.4.3 Device Specific Settings
4.4.3.1 Media Interface
Navigate to System Management > Device Specific Settings > Media Interface. Create Internal and External Media Interface as shown below.
4.4.3.2 Signaling Interface
Navigate to System Management > Device Specific Settings > Signaling Interface. Create Internal and External Signaling Interface as shown below.
4.4.3.3 End Point Flows
Navigate to System Management > Device Specific Settings > End Point Flows. Select the Server Flows tab and click Add. Create a Server flow for Avaya Session Manager as shown below.
Select the Server Flows tab and click Add. Create a Server flow for Nexmo as shown below.
4.5 Avaya Modular Messaging
This section describes the steps for configuring the Avaya Modular Messaging to inter-operate with Avaya Aura Session Manager via SIP trunking.
4.5.1.1 Messaging Server
Navigate to Messaging Administration > Networked Machines to configure Modular Messaging Server parameters as shown below.
4.5.1.2 Subscriber
Navigate to Messaging Administration > Subscriber Management. Configure a subscriber for the Messaging server as shown below.
4.6 Nexmo Configuration
4.6.1 Configure Numbers in Nexmo Account
- Login to the Nexmo account using the credentials provided at the time of registration. A Key and Secret will be displayed on the dashboard and this can be used as the username and password for Registration SIP Trunks.
- In order to provide the URL to which the call has to be routed from Nexmo, navigate to the Numbers tab
- Click Edit against each number as shown below
-
A pop-up will be displayed
-
Select the " Forward to " and provide the URL to which the calls route
-
Click Update to save the changes
